Yandere Simulator is built with the Unity engine, making it super easy to mod with C#. Using this method, you can add custom content or remove content from the game or even add new things from the ground up - the sky really is the limit! This page provides you with tutorials on the most basic ways to mod the game.
This page is allowed to be edited as long as your information is correct.
If you have any questions, ask it in the comment section of this page!
Compatibility[]
You cannot reuse old assembly files from older build versions, because the Assembly-CSharp.dll file is updated with each version of the game. You can reuse some parts of the code, but you cannot reuse the entire code itself as it changes between versions.
This means that your mod will almost always only work on one specific version of the game unless you update it for other versions, and won't work on any versions of the game earlier or later than the one you built it on (unless it is updated).
Before You Start...[]
Required programs
In order to start modding the Assembly-CSharp.dll file, you'll need an assembly browser and decompiler. For example, DnSpy:
https://github.com/0xd4d/dnSpy/releases - Assembly browser, decompiler and editor.
Required knowledge
In order to modify the Assembly-CSharp.dll library, a basic level of C# is required in order to understand the way the scripts work and to write scripts that would allow to modify any part of the game.
In order to learn, an official tutorial about C# was released by Microsoft, which is the one recommended to start learning :
https://mva.microsoft.com/en-us/training-courses/c-fundamentals-for-absolute-beginners-16169
Once C# is learned, a basic knowledge of the Unity Engine API is recommended.
The Unity Engine API documentation is available here : https://docs.unity3d.com/ScriptReference/index.html
Getting Started[]
Note - Because the Assembly-CSharp.dll file is dependent on the rest of the game's files, you must edit the assembly file that is located in the game's "Managed" folder, NOT A BACK-UP.
OR
You can backup ALL the files in the 'Managed' folder and then edit it.
First, launch dnSpy, remove all the files from the left side of the interface by using File/Close All, and then open the Assembly-CSharp.dll file that is in your game's "Managed" folder of Yandere Simulator.
Modding any of the .dll files will require loading ALL of the .dll files, even if you're only editing one.
Try not to delete anything in the .dll files, because you can entirely break the game. You can (of course) reinstall the game if this happens, but it takes quite a bit of time, so make sure to back up your files in case something goes wrong.
So, now that all the preparations are done, let's begin!
Modding: Students's routine destinations[]
Location[]
In DNSpy, to edit Student.json file's destinations spots, you need to follow these directions. Filter through the Assembly-CSharp file until you have found the 'GetDestinations()' method.
Assembly-CSharp ==> StudentScript ==> GetDestinations() : void.
Tutorial[]
1. Click the right mouse button on some empty space and select "Edit method (C#)".
2. Move your cursor after the last bracket in the "if" block and press spacebar.
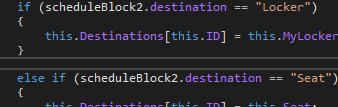
3. Copy this code and press CTRL+V in the DnSpy.
else if (scheduleBlock2.destination == "NAME"){this.Destinations[this.ID] = this.StudentManager;}
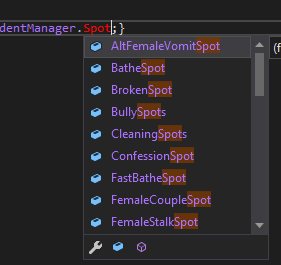
4. Write name of your spot instead of "NAME". Move mouse cursor to end of the "StudentManager" word, type dot (".") and write "Spot". DnSpy will show you what spots can you use.
If you want a student to follow another student, then use: StudentManager.Students[ID].transform
if you want to use Hangout spot of the another student, then use: StudentManager.Hangouts.List[ID].
if you want to use Lunch spot of the another student, then use: StudentManager.LunchSpots.List[ID].
And so on...
5. Press "Compile" button. Go to File/Save all --> Ok.
6. Close DnSpy. edit the Student.JSON file and launch the game.
Modding: Students' reputation[]
Location[]
In DnSpy, to edit a student's reputation, you have to follow these directions. You'll find it in Assembly-CSharp file.
Assembly-CSharp ==> StudentManagerScript ==> InitializeReputations() : void.
Tutorial[]
1. Click the right mouse button on some empty space and select "Edit method (C#)".
2. Find the line with an ID you are looking for (check in JSON files what ID your student has). Mark the number before one of the "f" letters and delete it.
3. Write any number instead of the previous one (-100 to 100 is recommended)
4. Press the "Compile" button. Go to File/Save all --> Ok.
5. Close DnSpy and start the game. Reset the week to see the changes.
Note1: If you enter values less than -100 or greater than 100, the reputation triangle will be bugged, but the student will continue to function correctly.
Note2: There are three values in each line. They change students' reputation in the following order: liking, respect, fear
Note3: Some of the students have an established reputation (for example Senpai, Delinquents), so if you want to change their general reputation (not individual elements), you have to look deeper into the code. I haven't found a place where to do it yet.
Modding: Students' animations[]
Location[]
In DnSpy, to edit a student's animations, you have to follow these directions. You'll find it in Assembly-CSharp file.
Assembly-CSharp ==> StudentScript ==> Start() : void.
Tutorial[]
1. Click the right mouse button on some empty space and select "Edit method (C#)".
2. Press ctrl + f and search "studentID == 1" to find the place you search.
3. Check if there is a code related to the searched ID. If there is...
Move your cursor after the first bracket in the "if" block.
1. Copy this code and press CTRL+V in the DnSpy after the text in the "if" block.
if (this.StudentID == [selected ID])
{
[The place for your text]
}
2. Change "selected ID" to your chosen ID and select "[The place for your text]". You'll edit it.1. Move your cursor after the second bracket in the "if" block and click "enter".
2. Copy this code and press CTRL+V in the DnSpy after the text in the "else if" block.
else if (this.StudentID == [selected ID])
{
[The place for your text]
}
3. Change "selected ID" to your selected ID and select "[The place for your text]". You'll edit it.4. Copy this code and press CTRL+V in the DnSpy.
this.[typeofanim] = [nameofanim];
5. Write type of animation instead of "typeofanim" and name of the animation instead of "nameofanim". Write name of the animation instead of "nameofanim". If you want to give student an animation from pose mode - put it in quotes.
this.IdleAnim = "f02_readyToFight_00";Remember to check the name of the animation in the game!
this.WalkAnim = this.ParanoidWalkAnim;
this.CameraAnims = this.CowardAnims;
Remember that "ParanoidWalkAnim" isn't the name you can check in the game!
this.WalkAnim = "[name of the anim]";
this.IdleAnim = "[name of the anim]";
this.RunAnim = "[name of the anim]";
this.OriginalSprintAnim = "[name of the anim]";
or
this.SprintAnim = "[name of the anim]";this.OriginalSprintAnim = this.SprintAnim;
this.RelaxAnim = "[name of the anim]";
this.MiyukiAnim = "[name of the anim]";
this.ScaredAnim = "[name of the anim]";
this.CameraAnims = [name of the anim];
The names of camera animations:
- this.CowardAnims
- this.HeroAnims
- this.EvilAnims
- this.SocialAnims
this.ParanoidAnim = "[name of the anim]";
this.LeanAnim = "[name of the anim]";
this.PatrolAnim = "[name of the anim]";
6. Press "Compile" button. Go to File/Save all --> Ok.
7. Close DnSpy and launch the game. Reset week.
Modding: Spawning Rivals[]
Location[]
In DnSpy, to spawn rivals, you have to follow these directions. You'll find it in Assembly-CSharp file.
Assembly-CSharp ==> StudentManagerScript ==> SpawnStudent(int spawnID) : void.
Tutorial[]
1. Click the right mouse button on some empty space and select "Edit method (C#)".
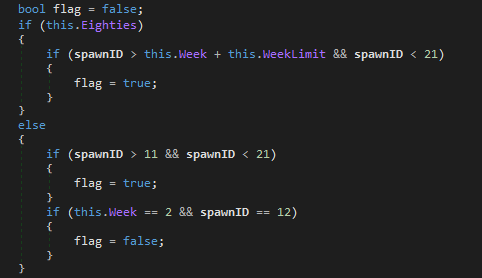
2. You will find this.
3. And, you want to enable rivals in...
4. Change "flag = true" to "flag = false" in line 1070.
4. Change "flag = true" to "flag = false" in line 1063.
4. Change "flag = true" to "flag = false" in line 1070 and line 1063
5. Press "Compile" button. Go to File/Save all --> Ok.
6. Close DnSpy and start the game.
Note1: 20XX Rivals will not have all textures, so you have to texture them by yourself. You can use Pose Mod or Dll for this.
Note2: Gabloutron figured it out how we can put student uniform by DLL!
Modding: Set Student's Uniform[]
Location[]
In DnSpy, to set student uniform, you have to follow these directions. You'll find it in Assembly-CSharp file.
Assembly-CSharp ==> CosmeticScript ==> SetFemaleUniform() : void.
Tutorial[]
1. Get the uniform that you want to set with your student.
2. Click the right mouse button on some empty space and select "Edit method (C#)".
3. After that, put this inside...
else if (this.StudentID == ID)
{
      if (StudentGlobals.FemaleUniform == UNIFORMID)
      {
           Texture2D texture = new WWW("file:///" + Application.streamingAssetsPath + "/YourUniformTexture.png").texture;
           this.UniformTexture = texture;
           this.CasualTexture = texture;
           this.SocksTexture = texture;
      }
}
4. Press "Compile" button. Go to File/Save all --> Ok.
5. Close DnSpy and start the game.
Enjoy~!!!!
Note1: Replace "YourUniformTexture" with texture of uniform.
Note2: Replace "UNIFORMID" with an uniform number. For example: 1 is Uniform, 2 is Long, 3 is Sweater, 4 is Blazer, 5 is Dark Blazer, 6 is 1980s Mode Uniform.
Note3: Replace "ID" to the student you want to set uniform with.
Note4: You can change "texture" with whatever you want!
Modding: Add 10 weeks in the 202X Mode[]
Tutorial[]
1-Go to AssemblyCSharp >>StudentManagerScript >>SpawnStudent()
and find this:
else
{
if (spawnID > 11 && spawnID < 21)
{
flag = true;
}
if (this.Week == 2 && spawnID == 12)
{
flag = false;
}
}
Make it looks like this:
else
{
if (spawnID > DateGlobals.Week + 10 && spawnID < 21)
{
flag = true;
}
if (this.Week == 2 && spawnID == 12)
{
flag = false;
}
}
2-After that,go to Awake() and find this:
if (!this.TakingPortraits && !GameGlobals.Eighties && DateGlobals.Week > this.WeekLimit)
{
Debug.Log("We're not in 1980s Mode and Week is " + DateGlobals.Week.ToString() + " so we're resetting the week to ''0'' and booting the player out.");
DateGlobals.Week = 0;
SceneManager.LoadScene("VeryFunScene");
and delete it
3-Compile and go to BusStopScriptàExitCutscene() and find this:
“DateGlobals.Week = 2”
Make it so it looks like this
DateGlobals.Week++
4-CalendarScriptàStart()à and find this
else if (DateGlobals.Week > 2)
{
Debug.Log("Save file had to be deleted because 80s and 202X got mixed up.");
this.ResetSaveFile();
}
Delet it
5-This is optional but always in Start() if you want to delete the Amai Challenge button delete the 128 line (this.AmaiButton.SetActive(true) ) and put “this.SkipButton.SetActive(true).
In ChangeDayColor() find this:
if (!this.Eighties && DateGlobals.Week == 2)
{
this.SkipButton.SetActive(false);
}
Just change the “false” in “true”.
Find this:
UILabel[] array = this.DayNumber;
for (int i = 0; i < array.Length; i++)
{
array[i] != null;
}
And delete it.
6-In Start() in CalendarScript find this:
else if (DateGlobals.Week == 2)
{
this.DayNumber[1].text = "10";
this.DayNumber[2].text = "11";
this.DayNumber[3].text = "12";
this.DayNumber[4].text = "13";
this.DayNumber[5].text = "14";
this.DayNumber[6].text = "15";
this.DayNumber[7].text = "16";
this.Adjustment = -50;
this.AmaiButton.SetActive(true);
under that put this:
}
else if (DateGlobals.Week == NUMBER)
{
this.DayNumber[1].text = "DAY";
this.DayNumber[2].text = "DAY";
this.DayNumber[3].text = "DAY";
this.DayNumber[4].text = "DAY";
this.DayNumber[5].text = "DAY";
this.DayNumber[6].text = "DAY";
this.DayNumber[7].text = "DAY";
this.Adjustment = -50;
this.AmaiButton.SetActive(false);
This will fix a bug that make the Days number be 4
WARNING >the other weeks wont have the deadlines only week 1 will have!
PS:the ending will be the 1980's ending
7-Compile and save all!
Modding: List of Elimination Method IDs[]
I needed these personally and I decided to share! (also idk if this is the right place but it seems to fit dll soooo)
- 1 = Attacked
- 2 = Befriending
- 3 = Betrayed
- 4 = Bullied
- 5 = Burned
- 6 = Crushed
- 7 = Drowned
- 8 = Electrocution
- 9 = Expelled
- 10 = Fan Elimination
- 11 = Framed
- 12 = Kidnapped
- 13 = Matchmade
- 14 = Murder-Suicide
- 15 = Poisoning
- 16 = Pool
- 17 = Pushed
- 18 = Rejecting
- 19 = Suicide
- 20 = Exploded
Installing Assembly-CSharp.dll mods[]
Because an Assembly-CSharp.dll mod consists of an edited version of the game's source code, all you have to do to install one of these mods is find your Yandere Simulator Managed/ folder, and drag and drop the new Assembly-CSharp.dll and allow it to replace the old one.